My video project “Die Lockdown-Probe” is a satirical comedy about six musicians rehearsing online via Skype call. I wrote and filmed it during the coronavirus lockdown in spring 2020, and it officially premiered on New Year’s Eve 2020 as part of the streaming program of Konzert Theater Bern. The piece continues to enjoy popularity among classical musicians ever since.
For this particular project which I edited in Premiere Pro, I needed a 3×2 multiframe screen layout. After some tests I decided to use a layout with thin black lines separating the frames from each other to give it a better visual structure. I wanted the multiframe layout to fill out the whole 16:9 screen, that’s why I chose a setup that crops every single clip left and right, giving it an almost rectangular shape. If you decide to do it the same way, keep this in mind while filming regarding how you frame your subjects. In this article I am sharing the settings I used in Premiere Pro for any filmmaker seeking to achieve the same.
Here is what you need to do:

2. Go to your Effects panel, find the Crop effect and drag & drop it on each of the clips in your timeline.

3. In the Effect Controls panel of each clip, you will have to adjust the following settings:
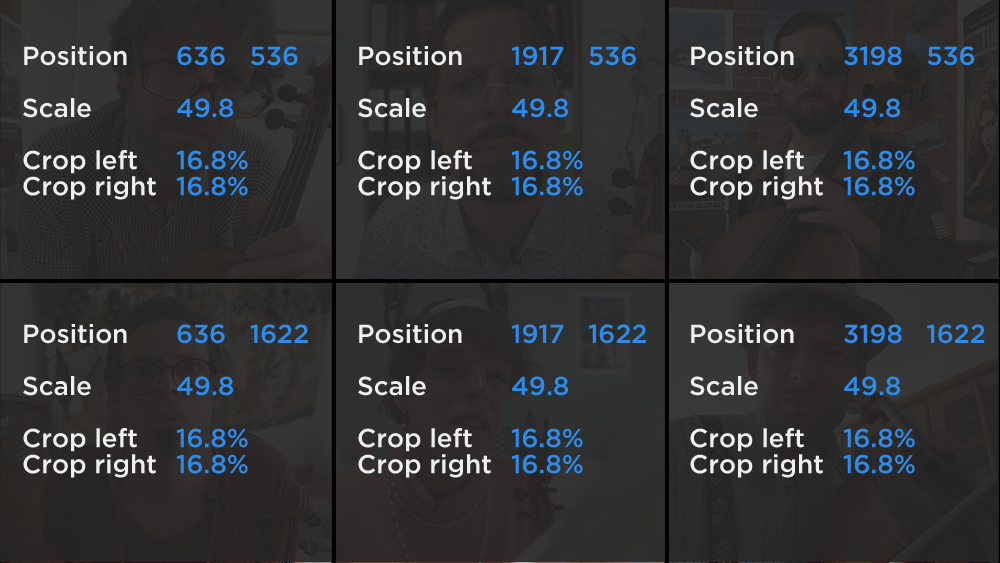
a) Position and Scale

b) Crop Left and Crop Right

Adjust those values as follows, depending on the resolution of the clips and timeline you are using:
#1 For 4K clips in a 4K sequence


#2 For HD clips in a 4K sequence


#3 For HD clips in a HD sequence


If your clips are in HD and you plan to have your final output in HD as well, the overall result will be considerably better if you arrange your HD clips in a 4K sequence and export the final video as HD. The multiframe clips will look sharper than if you scale them down in a HD sequence.
Final thoughts
The settings listed above will allow you to set up a multiframe 3×2 layout in Premiere Pro very easily. They are made for a design with thin black bars separating the frames from each other. If you do not want the bars, you can still use the settings above as a starting point and adapt the values for Position and Scale of each clip.
Which of the 3 options listed above should you use?
- If you do not have to worry about data volume while filming and your computer is powerful enough to playback six 4K clips simultaneously, using 4K clips in a 4K sequence will naturally give you the best result.
- Using HD clips in a 4K sequence will still give you an excellent result, no matter whether your final export is in 4K or HD. Even if you plan to have your final output in HD, I recommend to edit the HD clips in a 4K sequence and do the downscaling in the final export. This will give you better results than downscaling the HD clips in a HD sequence. If your multiframe layout needs to intercut with a layout displaying a single clip full screen, you are still better off blowing up your single HD clips to 200% and using them in a 4K sequence. Eventually they will be downscaled back to HD during final export.
- It may not seem intuitive, but downscaling your HD clips in a HD sequence gives you worse results than downscaling a 4K sequence to HD in the final export. It seems Premiere Pro is using a different algorithm for the scaling function in the Effects Controls Panel (especially as you cannot use a “set to frame size” option for this parameter) than it does for the overall downscaling process in the final export.
If you are looking for more complex multiframe setups than 3×2, you may want to rely on ready-made templates. Motion Array has one for Premiere Pro with 40 different presets for example. You can find more information here: https://motionarray.com/premiere-pro-templates/multiframe-188857.
I hope this article was helpful. If you have any thoughts or comments you’d like to share, please leave them in the comment section below.

